Wheelchair-Accessible Car Tents: Layouts That Fit Real Needs
By Mateo Alvarenga • 4th Dec
When you're planning a car camping trip as a wheelchair user or caregiver, generic "ADA-compliant tents" and inflated capacity claims won't tell you whether you can actually live in the shelter. Real accessibility happens at floor level: in door thresholds, turning radii, and headroom maps, not marketing specs. Unlike backpacking gear where ounces matter, car camping tents demand interior choreography that accommodates wheelchairs, mobility aids, and people moving through space. Let's translate confusing specs into verified layouts that prioritize human needs over minimum weight.
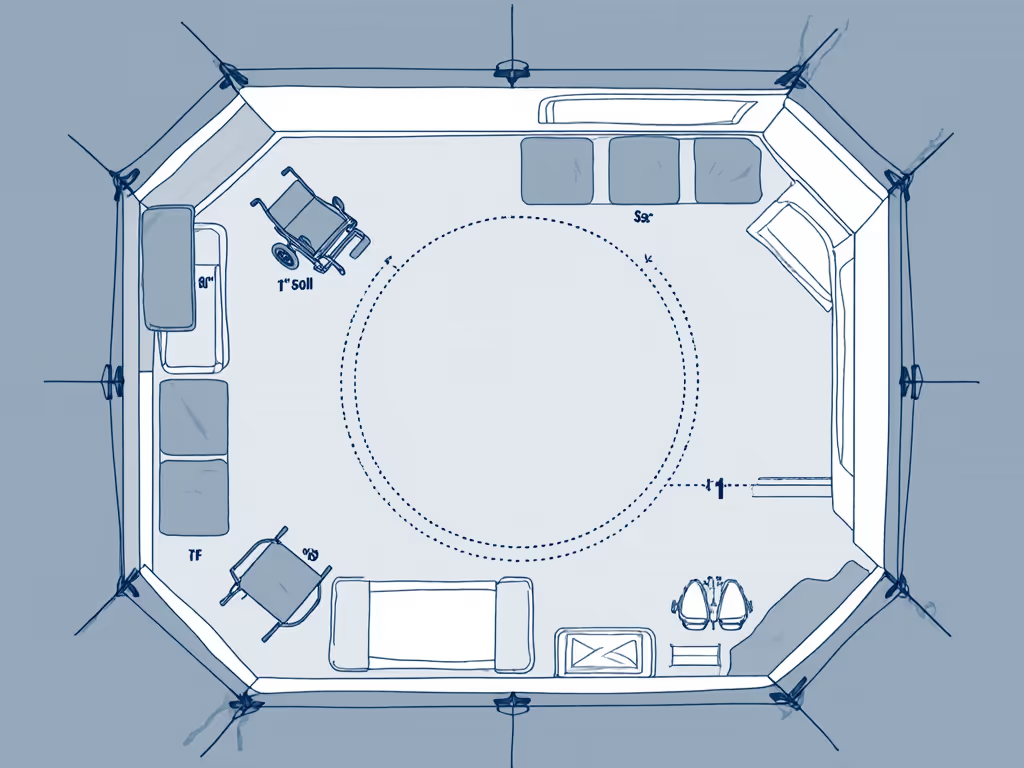
Headroom is a map, not a number. What appears as "6-person" on the tag often collapses to two sleepers and one mobility device when you map actual shoulder widths and knee clearance.
Why Capacity Numbers Lie (And What to Measure Instead)
That "6-person" dome tent? It's likely 120 inches long but tapers to 40 inches wide at the foot end (useless for wheelchair transfers). I once taped full-size pad cutouts to my living room floor, circled with my partner and shepherd until we realized "3-person" meant two sleepers and a story. The map changed our trips. Stop trusting occupancy labels. Start measuring these human factors:
- Door threshold height: Anything over 6" creates a tripping hazard during transfers. Look for zero-threshold designs or removable vestibules.
- Interior turning radius: Minimum 60" diameter for wheelchair pivots (ADA standard). Measure floor plans corner-to-corner.
- Sleep posture tagging: Side sleepers need 30" width; upright sleepers require 40"+ headroom at hip level.
- Knee clearance zones: Critical for transfers. Map where poles intersect floor space.
Step 1: Decode Tent Geometry for Real Mobility
Action: Sketch your wheelchair footprint (add 6" buffer on all sides) onto graph paper. Overlay manufacturer floor plans, but always subtract 15% for sloped walls and pole obstructions. Most brands exaggerate usable space by 20-30%. For realistic space planning, use our tent size and occupancy guide to translate tags into true sleeping capacity.
- Critical test: Can two people wheel side-by-side past sleeping pads? Many "family" tents choke at the door vestibule. Prioritize wheelchair-accessible shelters with dual doors or D-shaped layouts (like the Big Agnes Big House series mentioned in adaptive camping guides).
- Pro tip: Add 12" to your chair's width when comparing specs. Upholstery and clothing add hidden bulk.
Step 2: Verify Door/Vestibule Choreography
Action: Simulate entry sequences. Stand outside your current tent (or visit a store) and time how long it takes to:
- Transfer from chair to cot
- Maneuver mobility aids into vestibule storage
- Reach door zippers while seated
Most mobility-friendly tent designs fail at transition points. To keep mobility aids and medical kits accessible without blocking paths, see our vestibule storage solutions. Look for:
- Vestibules at least 36" deep x 48" wide for gear storage.
- Doors positioned away from prevailing winds (check campsite maps).
- Zipper pulls at seated shoulder height (32-36").
- No-pole door corners for unobstructed rolling.
One camper's review noted: "The Marmot Limelight's side door let me roll straight to my cot, but the center pole blocked my catheter kit storage. A simple layout change would fix this."
Step 3: Map Headroom for Upright Activities
Action: Create a headroom grid. Place masking tape every 12" along your floor plan. Measure vertical clearance at each point with a laser level (or tape measure). Highlight zones under 36" in red: these are "kneel-only" areas.
True accessibility requires 36+ inches of headroom over 75% of floor space for:
- Dressing while seated
- Using a shower chair (bring your ROHO pad)
- Preparing meals during storms
Many tents claim "peak height of 78"" but deliver only 18" at wheelchair transfer points. Camp cots raise sleep surfaces to seat height, ideal for chair-to-bed transfers, but verify they fit within the usable footprint, not just the tent's nominal size.
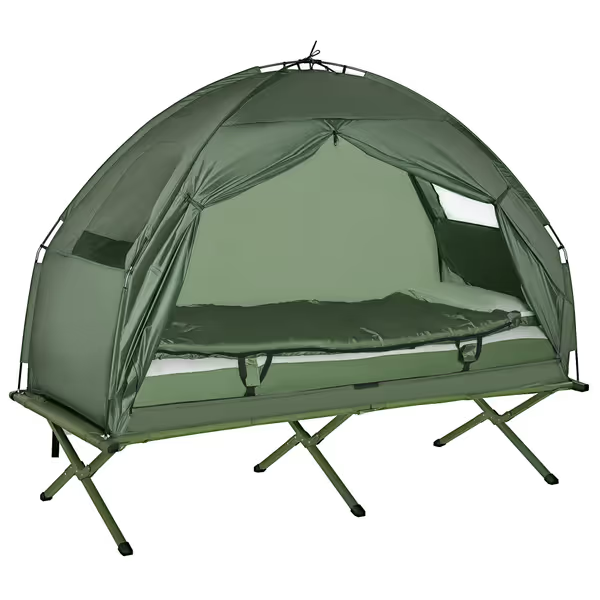
Outsunny 4-in-1 Folding Tent Cot Combo
All-in-one elevated tent cot for comfortable, off-ground camping.
$123.18
Weight Capacity250 lbs
Weight Capacity250 lbs
Pros
Complete camping combo: tent, cot, mattress, pillow, sleeping bag.
Elevated design keeps you dry and warm off the ground.
Quick setup for hassle-free adventures and travel.
Cons
Mixed feedback on durability and storm-worthiness.
Customers find the camping cot to be of good quality, easy to set up, and comfortable enough to sleep in with room to spare. They consider it well worth the price and say it works great at music festivals and for occasional camping.
Customers find the camping cot to be of good quality, easy to set up, and comfortable enough to sleep in with room to spare. They consider it well worth the price and say it works great at music festivals and for occasional camping.
Step 4: Prioritize Setup for Variable Ability
Action: Practice assembly with one hand (simulating limited dexterity). Time yourself in low light. Note:
- Pole attachment points within seated reach.
- Color-coded clips < 30" from floor.
- Vestibule guylines requiring < 15 lbs force.
"Easy tent setup" marketing often assumes full mobility. Seek designs with:
- Pre-attached rainflies.
- Single-pull vestibule tensioners.
- No-stake options for hard-packed sites (use rocks/sandbags).
In accessible campgrounds, uneven terrain is inevitable. If your pad is sloped, rocky, or sandy, use these challenging terrain setup techniques to stabilize your shelter. One tester reported: "My Hilleberg tent's glove-friendly toggles saved setup during a hand tremor episode, while my friend's complex clip system caused panic attacks."
The Reality of ADA-Compliant Tents
True compliance goes beyond checkboxes. Under the ADA, campgrounds must provide accessible sites, but shelters themselves aren't regulated. "ADA-compliant tents" is largely a marketing term. Focus instead on:
- Verified dimensions: Demand floor plans with pole locations (not just "floor area").
- Real-user feedback: Search "tent + wheelchair + transfer" in forums.
- Flex points: Can vestibules convert to covered roll-through areas?
As one adaptive camper noted: "A $500 'accessible' tent failed because the door zipper pull was nylon, too slippery for my grip. A $200 generic tent worked because the metal pull had ridges."
Your Action Plan: Next Steps Before Booking
- Request CAD files: Email manufacturers asking for vector floor plans with pole locations.
- Test at home: Tape your chair's footprint to the floor. Walk through your tent routine.
- Check campground specifics: Not all "ADA sites" have flat pads, ask about surface type.
- Prioritize repairability: Bring pole sleeves and seam sealant; remote sites lack gear shops. Pack smart with our tent repair kit comparison so you can fix poles, zippers, and fabric in the field.
Fit-first layouts turn marketing capacity into real sleep space. Whether you're unrolling a cot for catheter access or making room for a service dog, your tent's geometry determines whether you recharge in nature, or spend nights solving spatial puzzles. When you map headroom before miles, every trip becomes a restorative pause, not a logistical battle.
Author's note: I turn floor plans into real sleep by mapping shoulders, knees, paws, and pillows. Laser headroom lines, pad templates, and door/vestibule choreography help readers see whether a 'capacity' translates to a conflict-free night, especially for side sleepers and restless dogs.
Related Articles